Email:


Testing And Commissioning Of Current Transformer
Testing and Commissioning Procedures //
1. Objective
2. Test Equipment Required
3. Test procedures
Mechanical Check and Visual Inspection
Insulation Resistance Test
Polarity Test
Secondary/Loop Resistance Test
Burden Test (optional test)
Magnetization Curve Test (optional test)
Turns Ratio Test (optional test)
Primary Injection Test
High Voltage Test
Commisioning Test
4. Applicable Standards
5. Live VIDEO CT Testing (6 Testings)
1. Objective
To confirm the physical condition and electrical characteristics of current transformer installed in the installation. Ensure the CT is connected to system properly in all respect (primary and secondary).
2. Test Equipment Required
Required equipment for testing:
Insulation tester
Polarity tester
Digital low ohmmeter
Current source, multimeter
Variac, step-up transformer (0-2kv)
Primary current injection set
3. Test Procedures
3.1. Mechanical Check and Visual Inspection
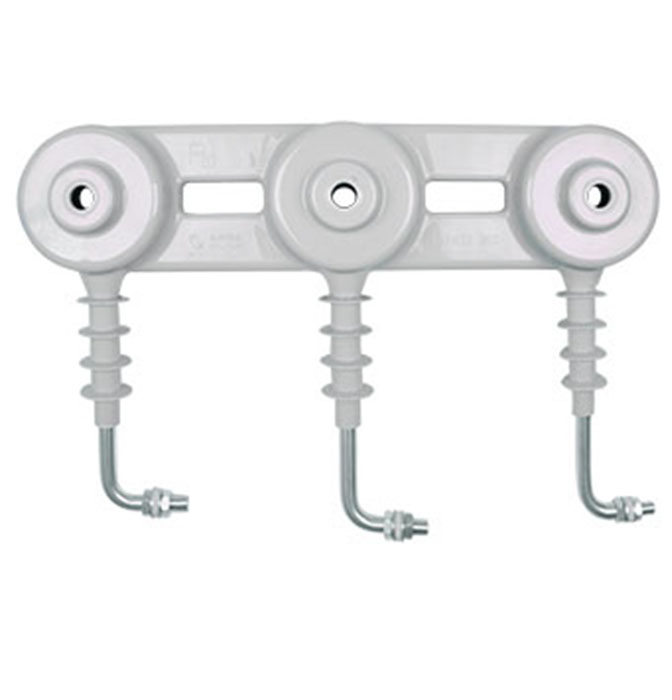
Verify nameplate ratings are in accordance with the approved drawings and specifications.
Inspect for physical damage/ defects and mechanical condition.
Verify correct connection of transformers with system requirements.
Verify that adequate clearances exist between primary and secondary circuit wiring.
Verify tightness of accessible bolted electrical connections by calibrated torque-wrench method.
Verify that all required grounding and shorting connection provided.
Verify all shorting blocks are in correct position, either grounding or open as required.
Verify single point grounding of eachcore done properly. Grounding point shall be nearer to the CT location. However grounding shall be at relay point in case of several CT secondaries connected together like differential protection.
3.2. Insulation Resistance Test
The voltage shall be applied between:
Primary to secondary plus ground (covered during switchgear test).
Secondary to primary plus ground.
Secondary core to core.
Test voltage limits mentioned in table below. The ambient temperature shall be noted down during test.
Table – Test Voltage Limits
| Rated voltage | Test voltage |
| 100-1000V AC/DC | 1000V DC |
| >1000 to 5000V | 5000V DC |
3.3. Polarity Test
Polarity test is to confirm the polarity marking on the CT primary and secondary and verify it is matching with drawing. More ever it is giving an idea, how to connect the secondaries to make the protection (like directional, differential) and metering function properly.
Isolate CT secondary from the load and make circuit connection as shown in Figure 1.
Close and open the battery switch connected on the primary. Observe the pointer is moving +ve direction, while closing and –ve direction while opening for correct polarity.

3.4. Secondary / Loop Resistance Test (optional test)
Secondary resistance test is to verify the CT secondary winding resistance with specified one and no discontinuity in the winding. This value can be used in other calculations.
Loop resistance to ensure load is connected properly and circuits not left open. The circuit connection shall be made as shown Figure 2 for secondary resistance. Measure the dcresistance value and record. The same shall be done for all taps and cores. These values are influenced by temperature, so ambient temperature must be recorded during this test. The circuit connection shall be made as shown Figure 2 for loop resistance.
Measure the dc resistance including CT and load, phase by phase and values can be compared between them.
Limits:
The value must be with in specified on nameplate after the effect of temperature taken in to account. If not factory test results shall be taken as reference.
 Figure 2 – CT resistance / Loop Resistance Test
Notes:
Ohmmeter connection for CT resistance excluding burden.
Ohmmeter connection for CT loop resistance including burden.
3.5 Burden Test (optional test)
Burden test is to ensure the connected burden to CT is with in the rated burden, identified on the nameplate.
Injected the rated secondary current of the CT, from CT terminals towards load side by isolating the CT secondary with all connected load and observe the voltage drop across the injection points. The burden VA can be calculated as
Burden VA = Voltage drop x rated CT sec. Current.
Limits:
The calculated burden should be less than rates CT burden.
Note:
Ammeter selector switch should be at respective phase during test.
High impedance relays shall be shorted during the test.
3.6. Magnetization Curve Test (optional test)
Magnetization Curve test is to confirm the magnetisation characteristics of CT with nameplate specification.
This test shall be conducted before ratio test and after secondary resistance and polarity test, since residual magnetism left in the core due to DC test (polarity, resistance), which leads additional error in ratio test. The meters used for this test shall be having true RMS measurement.
The circuit connection shall be made as shown Figure 3. The primary should be open during test.
Demagnetisation
Before start the test demagnetise the core by Inject voltage on secondary terminals and increase up to where considerable increment in current with small voltage increment. Now start decreasing the voltage to zero, the rate at which increased.
Magnetisation test
Now increase the voltage and monitor the excitation current up to the CT reaching near to saturation point. Record the reading of voltage and current at several points. Plot the curve and evaluate the Vk and Img from the graph.
Limits:
Class X CT:
The obtained Vk should be greater than specified one; mag current should be less than specified one.
Protection class CT:
The secondary limiting voltage can be calculated as follow:
Vslv = Is * ALF (Rct + (VA/Is*Is))
Where:
Is – rated secondary current
Rct – CT secondary resistance
VA – rated CT burden
ALF – Accuracy limit factor
The mag current (Img) drawn at Vslv can be obtained from graph. The following criteria should be satisfied.
Img < accuracy class * ALF * Is
Metering Class CT:
Accuracy can be ensured as follow:
Img at Vs (= 1.2 * VA / Is) should be less than (accuracy class * Is)
And instrument security factor to be verified.

3.7. Turns ratio Tests (optional test)
This test is to ensure the turn’s ratio of CT at all taps. The circuit connection shall be made as shown Figure 4. The primary current of minimum of 25% rated primary current to be injected on primary side of CT with secondaries shorted and the secondary current can be measured and recorded for all cores.
Limits:
The obtained turn’s ratio should match with rated nameplate ratio.
3.8. Primary Injection Test
This test is to ensure the CT circuits are properly connected with respected cores and there is no mix up in the circuit (phase identification).
The circuit connections shall be made as shown in Figure 4. Single point grounding shall be verified for CT circuits, before starting this test. Inject 25% of rated primary current between one phase and earth with all connected burden. Measure secondary current at all points of CT circuits. It shall be done for other phases.
Core identification:
When one CT is having several cores used for different purposes. The cores can be identified during primary injection test by shorting the one of the core at CT terminal itself and check there isno current only at relevant load. The same can be verified for other cores.
Inject 25% of rated primary current between phase to phase with all connected burden. Measure secondary current at all points of CT circuits. It shall be done for other phases.
Limits:
Secondary current should only be observed at respective phase and neutral leads during Phase to earth injection.
Secondary current should only be observed at respective phases and no current on neutral during Phase to phase injection.

3.9. High Voltage Test
This test is included with switchgear high voltage.
Objective of HV test is to determine the equipment is in propercondition to put in service, after installation for which it was designed and to give some basis for predicting whether or not that a healthy condition will remain or if deterioration is underway which can result in abnormally short life.
Test Instruments Required for HV Test
Calibrated AC hi-pot test set for switchgear with leakage current indicator and overload protection. Calibrated DC hi-pot test set for cables with leakage current indicator and overload protection.
3.10. Commisioning Test
After commissioning, secondary current measurement shall be carried out in CT circuits. Phase angle check shall be done for correct direction.
4. Applicable Standards
IEC 60044-1: Instrument transformers – current transformer.
IEC 60694: common specifications for HV switchgear.